
Creating an AWS Hosted Blog with Hugo
As a first post on this shiny new blog, I thought a guide on creating and hosting a blog would be appropriate. The idea is to detail the steps I went through in generating this blog and hosting it on AWS. Hopefully, someone else might find this useful.
This blog was created using Hugo, a static site generator written in Go. Content such as this blog post is written in markdown, which hugo converts to static pages and applies the author’s chosen theme.
Installing Hugo
To get started, you will need to download Hugo for your OS. On Debian/Ubuntu, Hugo can be installed from the default repositories
sudo apt-get install hugoInstructions on how to install Hugo on other operating systems can be found here.
Generate a new site
Once installed, run the following to create a new website in a directory of your choosing.
hugo new site myblogThis creates a directory called myblog with the following structure:
total 36
drwxrwxr-x  8 colman colman 4096 Sep 23 21:12 .
drwxr-xr-x 29 colman colman 4096 Sep 23 21:12 ..
drwxrwxr-x  2 colman colman 4096 Sep 23 21:12 archetypes
-rw-rw-r--  1 colman colman   82 Sep 23 21:12 config.toml
drwxrwxr-x  2 colman colman 4096 Sep 23 21:12 content
drwxrwxr-x  2 colman colman 4096 Sep 23 21:12 data
drwxrwxr-x  2 colman colman 4096 Sep 23 21:12 layouts
drwxrwxr-x  2 colman colman 4096 Sep 23 21:12 static
drwxrwxr-x  2 colman colman 4096 Sep 23 21:12 themes
Next up, you will need to select a theme from here and download one that you like into the the themes directory. I’m currently using the Tranquil Peak theme which can be added as follows:
git clone https://github.com/kakawait/hugo-tranquilpeak-theme.gitAnd with that done, you’re ready to create your first blog post. As previously mentioned, posts are written in markdown. Create a new blog post as follows.
hugo new post/test-blog-post.mdOpen test-blog-post.md in a text editor. Hugo would have already added some metadata within the file such as title which is the title of the blog post that will be displayed on the website. Depending on the selected theme, it may be possible to add other metadata fields to specify, for example the author’s avatar, tags and whether sharing should be enabled.
Add the content below to test-blog-post.md.
---
title: "My First Post"
date: 2017-09-23T22:08:12+02:00
draft: false
---

### Introduction

This is a test post.

Here's some html _code_:

```html
<!DOCTYPE html>
<html>
  <body>
    <h1> A heading </h1>
  </body>
</html>
```
> This is another way to display some text.

This another text format ```layouts/```
We are almost ready to generate the site. Depending on your chosen theme, it may be necessary to modify config.toml and add extra fields. This file contains properties and specifications that Hugo uses to generate your site. Required fields can typically be found in the theme’s github or Hugo page. For example, a typical casper theme config.toml looks like this:
baseURL = "http://example.org/"
languageCode = "en-us"
title = "My New Hugo Site"
paginate = 5
DisqusShortname = "YOUR_SHORT_NAME_HERE"
Copyright = "All rights reserved - 2015"
canonifyurls = true
theme = "casper"

[params]
  description = "Welcome to my website"
  metadescription = "Used as 'description' meta tag for both home and index pages. If not set, 'description' will be used instead"
  cover = "images/cover.jpg"
  author = "author name"
  authorlocation = "Author, Name"
  authorwebsite = "http://example.org"
  authorbio= "my bio"
  logo = "images/logo.png"
  googleAnalyticsUserID = "UA-79101-12"
  # Optional RSS-Link, if not provided it defaults to the standard index.xml
  RSSLink = "http://feeds.feedburner.com/..."
  githubName = "githubname"
  twitterName = "twittername"
  # facebookName = ""
  # linkedinName = ""
  # set true if you are not proud of using Hugo (true will hide the footer note "Proudly published with HUGO.....")
  hideHUGOSupport = false

  # Setting a value will load highlight.js and enable syntax highlighting using the style selected.
  # See https://github.com/isagalaev/highlight.js/tree/master/src/styles for available styles
  # A preview of above styles can be viewed at https://highlightjs.org/static/demo/
  hjsStyle = "default"

  [params.social]
    twitter = "your_twitter"
The fields are pretty self explanatory. Cover, author, logo and any other images can be placed in the static/images directory. Change your config.toml to contain any required fields for your chosen theme. It should also contain the theme field.
To generate the site and host it on a local web server, run the following in the root directory of your website.
hugo serveBrowse to http://localhost:1313/ on your browser to view the generated website.
Hosting on AWS S3
Log on or create an account on AWS. Browse to Host a static website and create a new website.
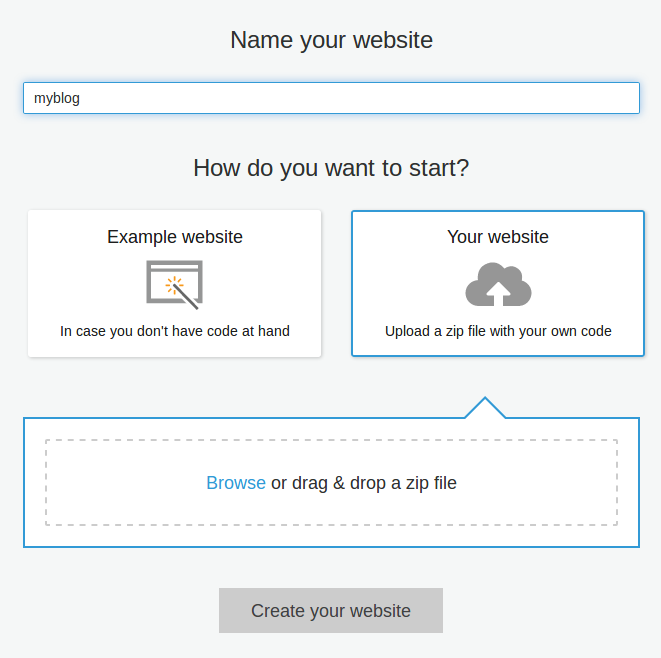
Give the website a name and use the example website for now. Click on ‘Create your website’. AWS will create and host your new site for you on a cloudfront URL. Take note of this URL and paste it in your config.toml as the baseURL.
Run the following to generate the site content.
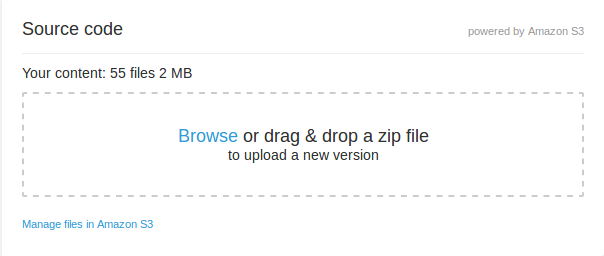
hugoThis will create a public directory containing the generated site. Compress the contents of this folder into a single zip file.
cd public
zip -R myblog.zip "*"
Upload the zip file to your newly created website on AWS.
 .
.
You can also register a domain through your website’s management page. Simply click on ‘Register a domain’ and follow the prompts. You may also wish to enable SSL for your new site using Amazon’s certificate manager. See here for a step by step guide.
Update - Hugo Deploy
As of May 2021, Hugo comes with a “deploy to cloud” feature which includes the ability to deploy to AWS! See the documentation for further details. Once you have got the AWS CLI configured and ready to go, and you have added an appropriate [deployment] section to your config file, you can deploy by simply running:
hugo deploy